代码手工艺人

Joey 写字的地方

事情是这样的,前几天电脑崩溃,硬盘数据全部丢失,重装系统和 Xcode 之后,从 Develop Center 的 Certificates 里重新下载证书,安装到新电脑上,在真机上运行时,提示报错:”A valid signing identity matching this profile could not be found in your keychain”, 按照字面意思查了一下,是因为本地 KeyChain 里丢失了 private key 的缘故,得到的结论是要么从之前的备份中恢复,或者重新生成新的证书。遗憾的是我之前并没有保存备份,无奈只好重新生成。一个问题马上出现在脑海,就是重新生成新的证书是否会对线上的 App 产生影响。查了一下官方的文档,发现有这部分详细的说明,消除了我的顾虑,内容如下 (参考 2):

Important: Members of the Standard iOS Developer Program can be assured that replacing either your developer or distribution certificate will not affect any existing apps that you've published in the iOS App Store, nor will it affect your ability to update those apps.

Notes before beginning:

Replacing your distribution certificate won't affect your developer certificate or development profiles.

Similarly, replacing your developer certificate won't affect your distribution certificate or distribution profiles.

Replace only your development certificate if you are troubleshooting an issue running your app on device through Xcode.

Replace only your distribution certificate if you are troubleshooting an issue creating, submitting or installing a distribution build.

After replacing your certificate(s) you are required to update and reinstall any provisioning profiles that were bound to the old certificate.

搞清楚问题和解决办法,就开工:

  1. 首先在 iOS Provisioning Portal 里 revoke 掉当前失效的 Certificates,并创建一个新的 Certificates (参考 [2])
  2. 通过 import 和 export Developer Profile 备份和恢复 (参考 [3] 和 [4])

Links:
  1. iOS Provisioning Portal
  2. How do I delete/revoke my certificates and start over fresh?
  3. Exporting and Importing Developer Profile
  4. Transferring Your Identities

Version & Build 号

Image1 icon

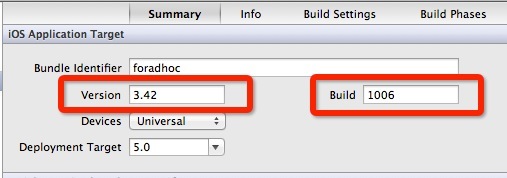
今天对 Xcode 里 iOS 的版本号又有了新的认识,一个叫做 Version,一个叫做 Build,这两个值都可以在 Xcode 中选中 target,点击 “Summary” 后看到。 Version 在 plist 文件中的 key 是 “CFBundleShortVersionString”,和 AppStore 上的版本号保持一致,Build 在 plist 中的 key 是 “CFBundleVersion”,代表 build 的版本号,该值每次 build 之后都应该增加 1。这两个值都可以在程序中通过下面的代码获得:

1
[[[NSBundle mainBundle] infoDictionary] valueForKey:@"key"]


### Archive后自动增长build号 除此之外,如果我们想在Archive后build号自动增长,就可以使用到Xcode的run script来实现,步骤是
  1. 选中项目的 target,点击 “Build Phases“
  2. 点击右下角的”Add Build Phrase“,选择”Add run script“,会产生一个新的 Run Script 项
  3. 拖拽新生成的 Run Script 项到最上面
  4. 点开该项,copy 下面的 shell 代码进去,代码来自 [这里](http://stackoverflow.com/questions/9855955/xcode-increment-
    build-number-only-during-archive?answertab=active#tab-top),如下图所示
1
2
3
4
5
6
7
8
9
10
11
12
13
14
15
16
17
18
if [ $CONFIGURATION == Release ]; then
echo "Bumping build number..."
plist=${PROJECT_DIR}/${INFOPLIST_FILE}

#increment the build number (ie 115 to 116)
buildnum=$(/usr/libexec/PlistBuddy -c "Print CFBundleVersion" "${plist}")
if [[ "${buildnum}" == "" ]]; then
echo "No build number in $plist"
exit 2
fi

buildnum=$(expr $buildnum + 1)
/usr/libexec/Plistbuddy -c "Set CFBundleVersion $buildnum" "${plist}"
echo "Bumped build number to $buildnum"

else
echo $CONFIGURATION " build - Not bumping build number."
fi

这段 shell 脚本的意思就是说,如果当前的配置是 Release(Archive 时该值为 Release,直接在模拟器上运行是 Debug),就设置 build 值为当前 build 值 + 1, 否则什么都不干。

这样在 build 的时候就会看到 build 号会自动加 1 的,想看 build 时输出的信息,可以通过”View -> Navigators -> Log” 来查看最新的 build 时产生的 log。


Ref:

  1. Concurrent Debug, Beta and App Store Builds
  2. stackoverflow: Xcode-Increment build number only during ARCHIVE?

Have fun!

KVC

KVC 是 Key-value coding 的缩写,是一种通过 key-value 的方式获取对象属性的机制。
这个 key 是一个 String 的唯一标示符,这个 key 的 name 约定是必须是 ASCII 码、小写字母开头、中间不能有空格。

让一个类实现 KVO 的方式是遵循 NSKeyValueCoding 这个协议,该协议中定义了 2 个方法:valueForKey: and setValue:forKey:. 这两个方法用来通过 key 访问和获取对象属性。

More about KVC

KVO

Apple Document about KVO

KVO 的实现方式:isa-swizzing

Lightweight Key-Value Observing

在 iOS 开发中,UINavigationController 是很常用的 Controller,对它的一般操作就像操作一个栈,push 和 pop。但也经常会遇到 pop 和 push 无法优雅的完成的操作,比如退回到中间的某个 VC 上,或者在第一个 VC 之前添加一个 VC 等,更甚者要重新构造整个 VC 的顺序,这时候 setViewControllers 方法就排上用场了,它使对 VC 栈的操作不再局限于 push 和 pop,而是构造整个 VC 栈并应用到当前的 UINavigationController 中,这个方法支持 iOS3.0+,放心使用。


#Sample

1
2
3
4
5
6
NSMutableArray * viewControllers = [self.navigationController.viewControllers mutableCopy];
[viewControllers removeLastObject];
[viewControllers addObject:newController];

[self.navigationController setViewControllers:viewControllers animated:YES];
// [viewControllers relase] // if non-arc

感谢 Allen (Weibo) 提供的代码和思路


#说明
下面这段摘自 Api 文档

You can use this method to update or replace the current view controller stack without pushing or popping each controller explicitly. In addition, this method lets you update the set of controllers without animating the changes, which might be appropriate at launch time when you want to return the navigation controller to a previous state.

If animations are enabled, this method decides which type of transition to perform based on whether the last item in the items array is already in the navigation stack. 

1.If the view controller is currently in the stack, but is not the topmost item, this method uses a pop transition; 
2.if it is the topmost item, no transition is performed. 
3.If the view controller is not on the stack, this method uses a push transition. 

Only one transition is performed, but when that transition finishes, the entire contents of the stack are replaced with the new view controllers. For example, if controllers A, B, and C are on the stack and you set controllers D, A, and B, this method uses a pop transition and the resulting stack contains the controllers D, A, and B.

Have fun!

Image1 icon

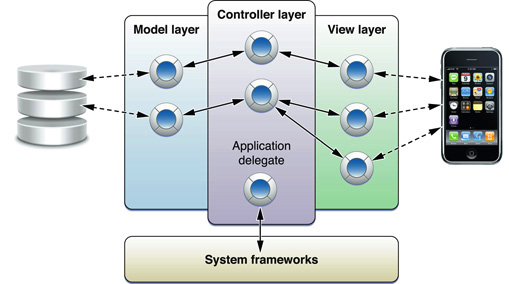
最近项目要重构,首当其冲的就是代码结构,因为很多原因之前很少考虑代码结构的事情。终于要抽出一部分时间来重构这个项目,首先是整个项目的结构和代码逻辑不太符合 MVC,又顺便了解了一下 iOS 里的 MVC 模式的概念。首先 MVC 模式不光定义了每一部分在整个应用中扮演的角色,也定义了各个部分相互沟通交流的方式。每一部分都扮演着不同的角色,分工明确,降低耦合,减少依赖,使得每一部分都能够复用,这也是 MVC 模式的意义和目的所在。下面就简单描述一下 MVC 模式里对每一个角色的职能和责任。

Model

Model 层对象应该是封装了一定的数据规范,并且定义了管理和处理这些数据的逻辑和计算。简单说就是 Model 对象不仅定义了数据结构,还要包括对数据结构的操作和处理逻辑。比如从网络、sqlite、UserDefault 里获取需要在 View 里展现的数据以及存入用户感兴趣的数据等等。其实 Model 里是包含业务逻辑的,这一点和 Web 开发差异很大,之前在用 Java 开发 Web 程序时使用 MVC,M 就是 POJO,只包括定义数据结构,不包含对这些数据的处理 (处理的部分放在一个叫 Service 层里),也称之为贫血模型。相对应的充血模型就类似这里的 M,是包含对数据的操作和处理,ROR 里的 ActiveRecord 就是这样的。

View

View 层的理解就很简单了,就是用户能看得见的东西,比如 UIKit 里的各种系统自带控件等。View 对象应该知道如何把自己展示给用户并且对用户的操作做出回应。View 层对象的主要用途在于展示出应用的 Model 层数据并且允许用户通过交互修改这些数据。

Controller

Image2 icon

Controller 层对象相当于一个中间人,负责协调应用中的 View 层对象和 Model 层对象的关系,也是 View 和 Model 相互沟通的媒介。除此之外,Controller 还负责组织和协调应用中的任务以及管理其他对象的声明周期。

相互的沟通

Image3 icon

Model 层不直接和 View 沟通,当 Model 层对象改变(比如通过网络获取到了新的数据),它会通知 Controller 对象,Controller 对象收到通知更新对应的 View。当 View 层有改变(比如用户通过交互创建或修改了数据,称为 User Action),View 会通过 Controller 对象去创建或修改 Model 层的数据。 Model 层和 View 层是相互不知道对方的,它们的沟通是通过 Controller 这个中间人来协调处理。

Jekyll 默认的社会化评论组件是 disqus,第三方 SNS 是 facebook,twitter 等,不方便大陆用户使用,发现国内也有类似的社会化评论组件,比如友言等,经比较发现友言更简单易用。

替换的整个过程很简单,分为两大步:
首先要注册一个友言的账户,点击获取代码,就能获得一段和你用户相关的 js 代码。类似下面这样:

1
2
3
4
<!-- UY BEGIN -->
<div id="uyan_frame"></div>
<script type="text/javascript" id="UYScript" src="http://v1.uyan.cc/js/iframe.js?UYUserId=YOUR_USER_ID" async=""></script>
<!-- UY END -->

然后要切换到本地来,由于 Jekyll 的评论组件是插件式的,很方便修改,分为下面 2 个步骤

  1. 修改_config.yml 文件中 comments: 下的 provider: 的值为 custom(默认是 disqus)
  2. 在_includes 目录下新建一个目录 custom, 在 custom 目录下新建一个文件 comments,文件的内容就是上面从友言获得的那段代码。

push 到 GitHub,刷新页面查看效果吧

这么做的原理很简单,看一下 youname.github.com/_includes/JB/comments 文件的
看最后一个 when 语句,当 site.JB.comments.provider 的值为 custom 时,就加载 custom/comments 文件,那么其实 site.JB.comments.provider 的值就是刚才在_config.yml 中设置的那个 provider,这样就能说的通了。

Have fun!

FMDB 是 Objective-C 上操作 Sqlite 的开源库,与原生的操作 sqlite 数据库相比,有以下几个优点:

  1. 操作方便、简单、代码优雅,易于维护;
  2. 线程安全,用着更放心,很少出现过锁死数据库文件以及 Crash 的现象。

FMDatabase 不是线程安全的,一个 FMDatabase 对象一定不能在多线程中使用,为了保证线程安全,可以在 FMDB 中采取下面两种方式:

  1. 每个线程都创建一个 FMDatabase 对象,使用之前打开连接,用完关闭销毁;
  2. 使用 FMDatabaseQueue 来保证线程安全,一个 FMDatabaseQueue 的对象可以在多线程中共享使用。

使用 FMDatabase 时,一般这样来做:

1
2
3
4
5
6
7
8
9
10
11
12
13
14
//创建一个 FMDatabase的对象
FMDatabase *db = [FMDatabase databaseWithPath:@"/tmp/tmp.db"];
//判断db是否打开,在使用之前一定要确保是打开的
if ([db open]) {
//使用FMDatabase操作数据库
FMResultSet *s = [db executeQuery:@"SELECT * FROM myTable"];
while ([s next]) {
//retrieve values for each record
}

//关闭
[db close];
}
db = nil;

上面的这段代码是使用 FMDatabase 操作数据库的一个典型的使用方式,可以看到,其实我们关注的只是使用它来对数据库进行增删改查的操作,却每次都要写这些打开和关闭的操作,代码也显得臃肿,bad smell。用过 Java 中著名的 Spring 框架的同学都记得里面对数据库操作提供了一个 Template 的机制,比如 JdbcTemplate、HibernateTemplate 等,使用回调函数非常优雅的分离了创建连接、关闭连接和使用数据库连接操作数据库,下面就来模拟这个实现。
首先做个抽象,在上面代码的真正的逻辑中,我们只要拿到 db 变量就能满足我们的需要了,那么我们就把这一块抽象出来,在这里我们使用 oc 里的 block 来实现回调功能:

1
2
3
4
5
6
7
8
9
10
11
12
13
14
15
16
17
18
19
20
21
22
23
24
25
//创建一个工具类TWFmdbUtil
@implementation TWFmdbUtil
+ (void) execSqlInFmdb:(void (^)(FMDatabase *db))block {
NSString *dbPath = @"dbpath"; //sqlite数据库文件的路径
//创建一个FMDatabase的对象
FMDatabase *db = [FMDatabase databaseWithPath:dbPath];
//使用之前保证数据库是打开的
if ([db open]) {
@try {
block(db); //调用block来回调实现具体的逻辑
}
@catch (NSException *exception) {
//处理异常,也可以直接抛出,这样调用者就能捕获到异常信息
NSLog(@"TWFmdbUtil exec sql exception: %@", exception);
}
@finally {
[db close]; //如果[db open]就要保证能关闭
}
} else {
//如果打开失败,则打印出错误信息
NSLog(@"db open failed, path:%@, errorMsg:%@", dbPath, [db lastError]);
}
db = nil;
}
@end

现在使用的时候就能够像下面这样来实现了:

1
2
3
4
5
6
7
[TWFmdbUtil execSqlInFmdb:^(FMDatabase *db) {
//处理业务逻辑
FMResultSet *s = [db executeQuery:@"SELECT * FROM myTable"];
while ([s next]) {
//retrieve values for each record
}
}];

这样的代码看起来是不是优雅多了呢?我们无需关心数据库的创建和关闭操作,只需要关心我们的业务逻辑就可以了。

历史总是惊人的相似,FMDatabaseQueue 的使用就是采用这样的方式来处理的,来看一段 fmdb 主页上提供的一个例子:

1
2
3
4
5
6
7
8
9
10
11
FMDatabaseQueue *queue = [FMDatabaseQueue databaseQueueWithPath:aPath];
[queue inDatabase:^(FMDatabase *db) {
[db executeUpdate:@"INSERT INTO myTable VALUES (?)", [NSNumber numberWithInt:1]];
[db executeUpdate:@"INSERT INTO myTable VALUES (?)", [NSNumber numberWithInt:2]];
[db executeUpdate:@"INSERT INTO myTable VALUES (?)", [NSNumber numberWithInt:3]];

FMResultSet *rs = [db executeQuery:@"select * from foo"];
while ([rs next]) {
//...
}
}];

更多实例请移步 FMDB 在 GitHub 上的主页
或者访问 @唐巧_boy 关于 FMDB 的这篇文章

Have Fun!

使用 diff 查看文件更改信息

1
2
3
4
5
6
7
8
9
10
#查看未暂存文件的变化(与最近一次的暂存/提交比较)
$ git diff
#查看已暂存文件的变化(与最近一次提交比较)
$ git diff --cached
#查看与版本库中任一版本的变化
$ git diff 3e4e
#查看任意两个版本间的变化
$ git diff 3e4e 5d5a
#具体到某个文件
$ git diff 3e4e 5d5a index.md

查看任意版本下的某个文件

1
2
#查看某个版本下某个文件内容
$ git show i5d5a index.md

最近在 OSChina 上翻译版块有一个系列(共 4 篇)关于 Guava/Google Collections 库的文章,我也有幸翻译了一部分。Guava 的中文意思是番石榴,这个库的功能和名字一样诱人,很好很强大,使用起来也很方便,强烈推荐。
这几篇文章都是 2009 年写的,现在的 Guava 库应该已经更新了很多,不过对于了解 Guava 库还是 OK 的。

Guava 托管在 Google Code 上的地址在这里,目前最新版本是 14.0

最初的 Blog 放在了 GAE 上,使用一个叫 B3log 的 Blog 程序,但是间歇性的被墙访问不了,或者就是打开页面很慢,用着纠结;然后打算自己搞个 VPS,于是乎在 42qu 上买了个 VPS,搭建了一个 WordPress,使用很方便,但是需要经常担心服务器哪天挂掉,或者被攻击,或者哪个模块出问题要跑到服务器上检查。而且 WordPress 的绝大多数功能我也用不着,我一般就是写点文字放点代码而已,再加上 Jekyll 也很热,就尝试了一下 Jekyll,发现这才是我想要的 Blog 形式,非常简单,页面也很简洁,写作方式也很 Geek。打算暂时用 Jekyll 来写东西。

0%