写个自己的 Xcode4 插件
刚写 iOS 程序的时候就知道 Xcode 支持第三方插件,比如 ColorSense 等很实用的插件,但 Xcode 的插件开发没有官方的文档支持,一直觉得很神秘,那今天就来揭开它的面纱。
在 Xcode 启动的时候,它会检查插件目录 (~/Library/Application Support/Developer/Shared/Xcode/Plug-ins) 下所有的插件 (扩展名为.xcplugin 的 bundle 文件) 并加载他们。其实到这里我们就猜到了,我们做的插件最终会是一个扩展名为.xcplugin 的 bundle 文件,放在插件目录下供 Xcode 加载。
OK,我们先做一个简单的插件,需要很简单的几个步骤即可完成,我的环境是 Xcode 4.6.3 (4H1503)。
1. 新创建一个 Xcode Project
Xcode 插件其实就是一个 Mac OS X bundle,所以可以参考下图创建一个 Bundle。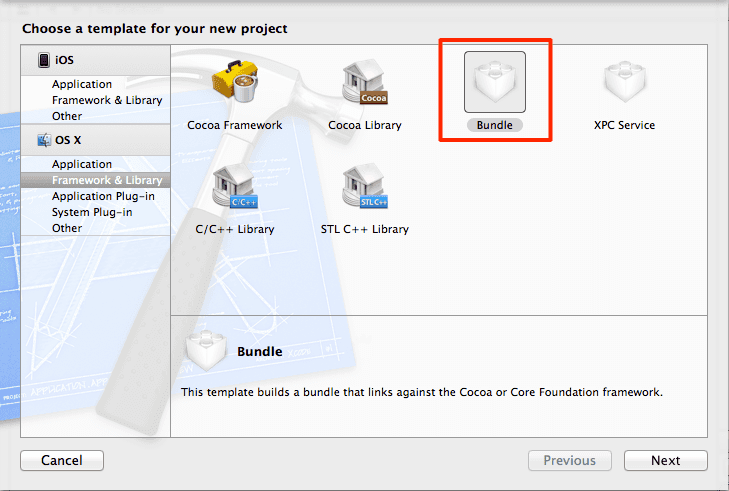
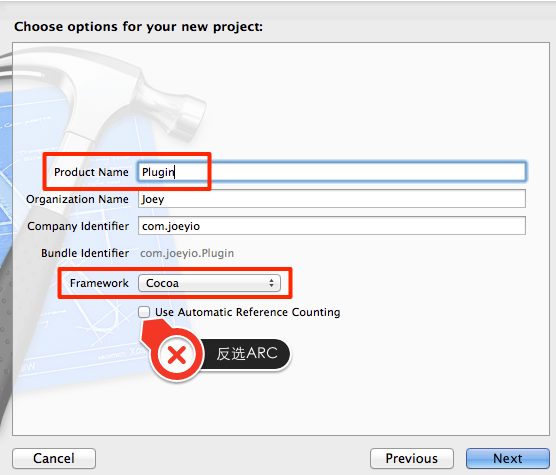
给 Project 起个名字,并确保不要勾选 Use automatic reference counting,因为 Xcode 是使用 GC 来管理内存的,所以 Xcode 的插件也需要是用 GC 来管理内存的。Framework 选择 Cocoa。
2. 设置 Target Info
像下图一样设置这些信息
XC4Compatible=YESXCPluginHasUI=NOXCGCReady=YESPrincipal Class=Plugin(这个设置为你插件的名字,本例中命名为Plugin)
前三个可能 Info 里缺省没有,可以自己添加,都选 Boolean 类型,最后一个 Principal Class 是 String 类型。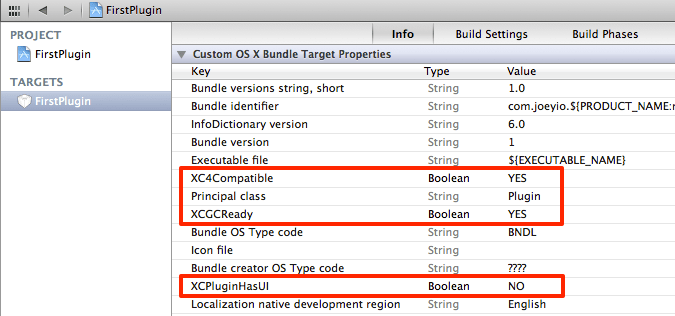
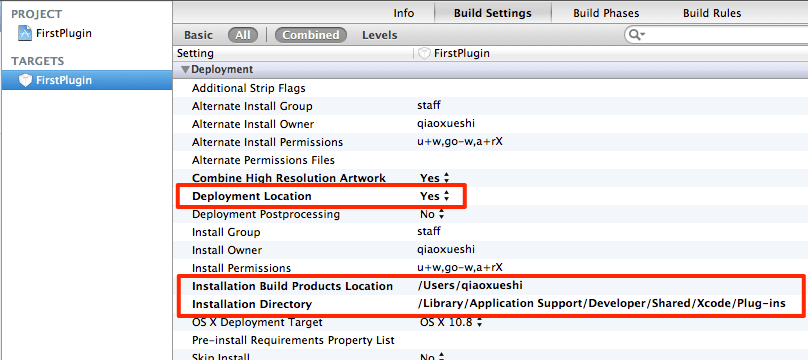
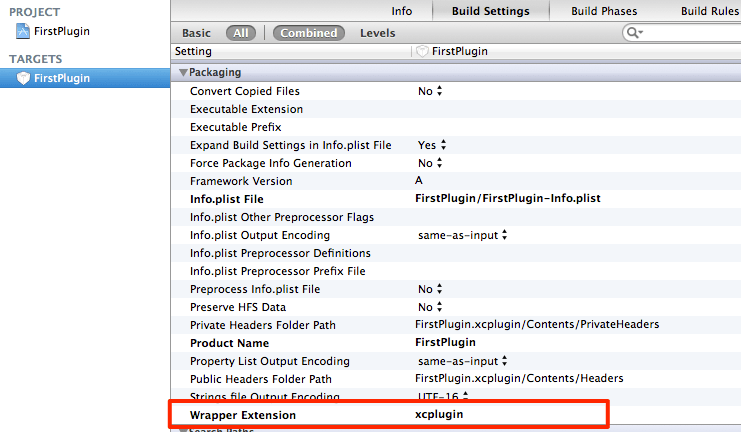
3. 设置 Build Settings
然后打开 Build Setting Tab,设置这些:
- 设置
Installation Build Products Location为${HOME},Xcode 会自动转换为你当前用户的 Home 路径 - 设置
Installation Directory为/Library/Application Support/Developer/Shared/Xcode/Plug-ins, Xcode 会把拼接Installation Build Products Location和Installation Directory为一个绝对路径来查找你的插件 - 设置
Deployment Location为YES - 设置
Set Wrapper extension为xcplugin
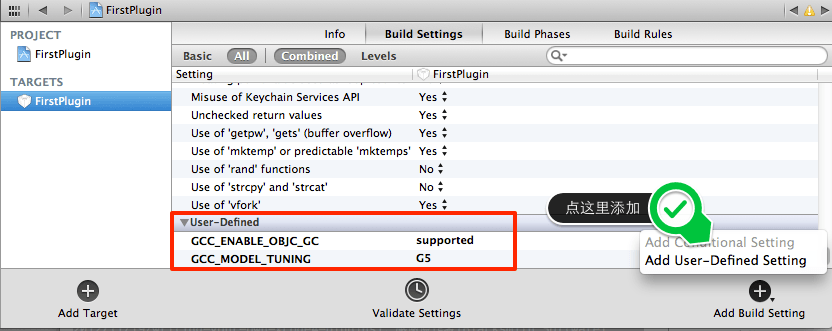
4. 添加 User-Defined 设置
- 设置
GCC_ENABLE_OBJC_GC为supported - 设置
GCC_MODEL_TUNING为G5
有了这些设置,每次 build 这个 Projct 的时候,Xcode 就会把 build 后的插件 copy 到 plugin 文件夹下,然后我们需要重启 Xcode 来重新加载新 build 的插件。开发插件相对来说简单一些,调试插件就比较纠结了,唯一的办法就是 build 之后,重启 Xcode,来加载最新 build 的插件。
准备工作已经结束,下面开始实现我们的插件。
5. 实现我们的插件
在第二步的时候我们设置了一个 Principal Class,那么在 Xcode 里新建 Objective-C 类,名字和 Principal Class 设置的值保持一致。在实现文件中添加上 + (void) pluginDidLoad: (NSBundle*) plugin 方法。 该方法会在 Xcode 加载插件的时候被调用,可以用来做一些初始化的操作。通常这个类是一个单例,并 Observe 了 NSApplicationDidFinishLaunchingNotification,用来获得 Xcode 加载完毕的通知。
1 | + (void) pluginDidLoad: (NSBundle*) plugin { |
一旦接收到 Xcode 加载完毕的通知,就可以 Observe 需要的其他 notification 或者在菜单中添加菜单项或者访问 Code Editor 之类的 UI 组件。
在我们的这个简单例子中,我们就在 Edit 下添加一个叫做 Custom Plugin 的菜单项,并设置一个⌥ + c 快捷键。它的功能是使用 NSAlert 显示出我们在代码编辑器中选中的文本。我们需要通过观察 NSTextViewDidChangeSelectionNotification 并访问接收参数中的 NSTextView,来获得被选中的文本。
1 | - (void) applicationDidFinishLaunching: (NSNotification*) notification { |
你会发现在出现 selectedText 的地方会报错,在实现里添加上 NSString *selectedText 即可。
1 | @implementation Plugin { |
最终效果: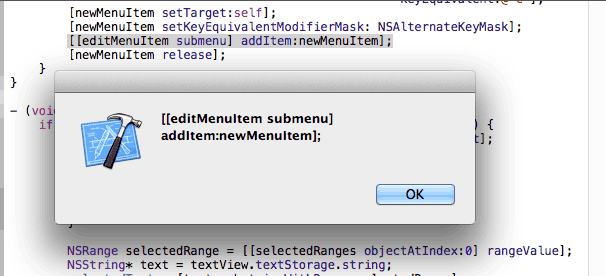
6. 需要注意的
Plugin 不能使用 ARC,需要手动管理好内存(谢谢 @onevcat 的提醒,因为是用 GC,不需要手动管理内存了)- 不能直接 Debug,不过可以在程序里通过 NSLog 打印出日志,并通过
tail -f /var/log/system.log命令来查看输出的日志 - 如果 Xcode 突然启动不起来了,可能是插件有问题,跑去
~/Library/Application Support/Developer/Shared/Xcode/Plug-ins目录下,把插件删掉,restart Xcode,查找问题在哪 - 如果 1-4 步骤的各种设置你比较讨厌的话,可以直接用这个 Xcode4 Plugin Template 来搞定,怎么使用在它的 Readme 中有详细的说明,:)
总结
这只是一个简单的 Xcode 插件的入门编写示例,不过 “麻雀虽小,五脏俱全”,可以了解到 Xcode 的插件一些东西,比如 Xcode 插件本质上其实就是一个 Mac OS X bundle 等等,而且因为没有 Apple 官方的文档的支持,很多东西只能去 Google,或者参考别人插件的一些实现。
REF
本文主要参考和编译自 WRITING YOUR OWN XCODE 4 PLUGINS,感谢原作者 Blacksmith Software
另:
前两天我们的小伙伴 @onevcat 写了一个 Xcode 插件 VVDocumenter,作用是在方法、类等前面输入三个 / 就会自动生成规范的 JavaDoc 文档 (Xcode5 中将支持 JavaDoc 类型的文档,对于我这样从 Java 转过来的来说是真是雪中送炭),赶紧 clone 了一个,用起来很方便,很好很强大,强烈推荐! 赶紧把我们的项目代码文档化起来,迎接 Xcode5 的到来吧,:)
Enjoy!!!